Are you looking for the best way to cut tiles? For this, you should use tile saw. Nothing beats this tool if what you’re looking for is a professional, clean cut. You can’t get that same level of fine cut if you use one of those snap tile cutters that you see on home TV shopping channels. Used properly and safely, the wet tile saw will help you get those cleanly cut tiles with near-perfect specifications.
The problem is, most people are intimidated by the tile saw. After all, the combination of flowing water, running electricity, and a rapidly-spinning diamond-encrusted circular blade can be a scary proposition. But if you want to do that bathroom makeover yourself, and accomplish it neatly—you must befriend that daunting tile saw and then master it.
Contents
Making the Connections
As you become more familiar with using the tile saw, you’ll find that connecting the hoses and plugging the tool into the power outlet can take so much time. That’s because you need to get everything right.
Most tile saw models have the following connections:
- A hose for the clean water which is connected to your water source
- Another hose for the dirty water that drains out onto a bucket
- Power cable plugged to the power outlet
- Some wet tile saws may also have a pump
You need to make sure that the water does not drip along the cord and into the power outlet. To avoid this, make a loop with the power cable and place it lower than both the power outlet and the tile saw.
If you’ve been putting off wearing safety goggles for your past DIY ventures, that needs to change. Water safety glasses is mandatory when using a wet tile saw.
Familiarize Yourself with the Parts
Most tile saws share the same parts. This would include the blade itself, blade guard, saw table, lock plate, and lock.
The saw table also comes with a measuring guide so you can cut your tiles precisely. The guides are usually found at the back and front edges of the saw table. As you cut tiles, the numbers in the guide will get covered with tile dust and water so you’ll need to regularly clean it off. Being precise with your measurements is the key to professional, clean results.
Know that you can move the lock plate sideways over the saw table. The locking mechanism ensures that the tile will not move about as you cut it. It’s similar to the lock on your bike’s seat. You pull the lever, move the lock plate, and then push the lever back in to fix the lock plate.
Once you’ve measured the desired tile length, position the tile against the locked plate. Note that you can lock the lock plate on either side of the saw table depending on how you want to cut the tile or what is more comfortable for you.
Turning on the Switch/es
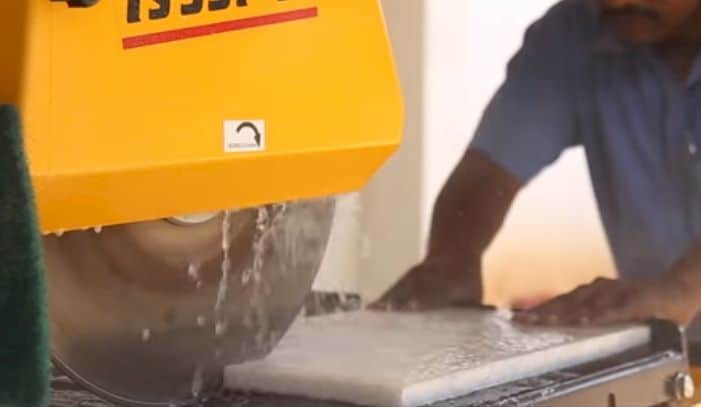
Some tile saws have a separate switch for the water. If yours has that, turn it on first. You need to make sure that the water is flowing freely, but not so fast that it splashes outside the drain tray. Don’t begin cutting if you don’t have proper water flow or you’ll risk breaking the tile, breaking the blade, or worse; you might cause injuries to yourself. The water is there to keep the tile, and the blade cool while you cut. It also attracts the tile particles, so they don’t fly around.
With the lock plate properly positioned and locked, the tile pressed snugly against the lock plate without touching the blade, and the water flowing, you can now turn on the power switch. This switch is usually located at the front of the saw table for easy access, although some models may have it on either of the sides. As a precaution, make sure that your hand is dry before switching on (or off ) the power to lessen the risk of an electric shock.
Cutting Properly
This part should be done with utmost care since this does bring you closer to the blade while it’s spinning at full speed. You should use both your hands when doing these unless you’re working with small tile cuts.
Start by pushing the tile sideways onto the lock plate, downward onto the table, and forward onto the blade. These actions should be done simultaneously using sufficient and equal pressure. This pressure should be enough to keep the tile from moving around as it gets cut by the blade.
There are cuts wherein using two hands might be impossible or unsafe because the distance between the lock plate and the blade is too narrow. Don’t think about using your fingers in this situation. Find a piece of wood that’s around 2 to 3 inches in length and use that to push your tile piece. You may also use another tile for the job. Note that in this scenario, there is a tendency for the tile being cut to rise, so you need to push it down snugly with your hand (the one not holding the piece of wood).
Continue pushing with equal pressure and constant speed until you’ve completely cut the tile. That’s it! You’ve successfully cut your first tile, and you’re on your way to transforming that bathroom. But first, remember that tile piece left on the saw table? Don’t remove it while the blade is still spinning. Turn off the saw and wait until it stops spinning, lift the blade guard, and remove any remaining tile pieces.
Wrapping it Up
These are just basic steps and safety tips on how to properly use a wet tile saw. You must keep the following things in mind.
- The blade should be rotating at full speed
- The tile is sliding with constant speed, and equal pressure is applied downward, sideways, and forward
- Water is flowing freely on the cutting area and the blade
- No tile particles flying outside the blade guard
Remember these, and you’ll be confident enough to use tile saw for your projects.