A scroll saw is a small saw that is used for making rather intricate cuts. Some models are pedal operated, while others are electric. It can be used on a variety of materials such as metal, wood, and others.
For this project, we'll go over how
We will have two versions of this project. The first one will have an old jigsaw. The sawing action and drive will all come from the
Contents
Home-made Scroll Saw Version One
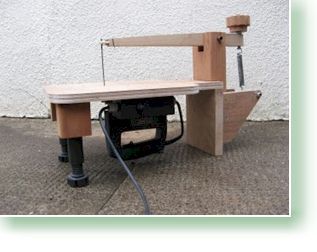
Let’s begin with version 1 of this project. This is how it should look like, give or take a few:
Tools and Materials
Here are the tools and materials for version 1 of this project:
- Old jigsaw (make the necessary repairs to ensure that it is still working).
- Some 20 mm marine plywood (for the base)
- Wood blocks
- Some hardwood, one of which will be cut into a height of about 190 mm (back piece). This will give the scroll saw some height.
- Tension
spring - Appliance feet (for the legs of this saw)
- M10 steel studding
How to Build Scroll Saw Version One
As you can see there is a huge square piece that will be cut into shape and the corners rounded off. Sand it off. I used marine plywood for this part.
That serves as the main working area. I designed mine to have a total surface area of 150 mm from each side of the blade.
A narrow neck was also affixed to it, also made from plywood.
To add height to the main working area I used appliance feet attached to wood blocks (I used a pair from a worn down personal fridge).
I used another piece of wood to make the adjuster for the tension spring. The pivot arm is made of hardwood. The end of the arm was drilled to fit the blade. Attach the square bar to act as the blade holder.
Attach the jigsaw to the bottom of the main work area using screws.
Home-made Scroll Saw Version Two
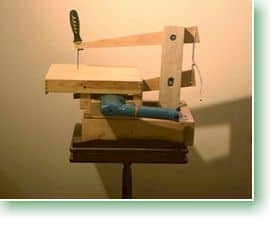
Version 2 will be slightly more difficult to assemble. Now here is how version 2 will look like:
If you don’t like the “woodier” design then you can make version 2 look like version 1 except that you will use the combination of a drill and a coping saw.
Tools and Materials
The materials for version 2 of this project will almost be the same as version 1 with a few extra materials:
- Coping saw
- A hand drill, preferably a cordless one that is battery operated or maybe a corded one—depends on which one you have lying around and unused.
- Appliance feet
- Heavy spring
- Plywood scraps (anything you have lying around)
- ¼ inch steel bar (I used the one from an old HP printer)
- Some long bolts
- Some pieces of hardwood
How to Build Scroll Saw Version Two
First, cut out a pair of arms from hardwood (I used oak). Shape them into a parallelogram, to mimic the look and design of a coping saw.
Next, disassemble your coping saw. You will only need the blade, the threaded handle, and the end pieces that hold the blade. Cut the slots so that they will angle back.
Affix the arms on a length of hardwood using bolts. This hardwood will serve as the post that holds the pair of wooden arms.
Here’s an important detail—the distance between the two bolts should be the same as the distance of the pivot pins on the blade. The goal here is to make a parallelogram out of all of these parts.
Cut out a main working area from plywood.
Make a rectangular frame to serve as the base. The width of the frame should be the same as the width of the main working area.
Shape the metal rod into an S shape and fix that on the drill.
Out of scrap wood, make a holder for the drill.
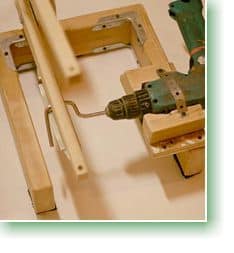
This is how you should put all of that together:
There is no rocket science involved, but it will require some work. As you can see from the picture above, the drill is on one side of the frame and the parallelogram of wood made of the two swinging arms where the blade will be attached is on the other side.
You can make the frame into a solid rectangular shape or you can make it the way as it is pictured above. It’s all up to you. There are no hard and fast rules here.
The assembly that’s holding the drill in place is made from three pieces of wood. There is a rectangular base that holds everything together. There are two blocks of wood that hold the drill in place. They have been cut into roughly the shape of the drill.
Of course you want the handle and the trigger of your hand
The bar that has been bent into an S shape should be attached to the bottom arm with a piece of scrap metal. As the drill spins this metal, the S shape will drag both arms up and down.
If you don’t have any scrap metal lying around, then you can use another bit of hardwood and screw it over the entire assembly. That would make the wood box in the drill.
Make sure that this drill assembly is tough
Mark where the blade should go through the main work area and then drill a hole big enough to fit the blade.
Affix the main work surface and then slide the blade through the top arm, the work surface and then the bottom arm. Attach the ends of the blade to the ends of the swing arms.
And that’s roughly how


“An impressive share! I have ust forwarded this onto a coworker who had been doing a little
homework on this. And he actually ordered me dinner simply because
I found it for him… lol. So allow me to reword this….
Thank YOU for the meal!! But yeah, thanks for spending some time to discuss
this topic here on your blog.
Good way of telling, and pleasant article to obtain information concerning my presentation subject, which i am going to convey in institution of higher education
It’s going to be end of mine day, except before end I am reading this wonderful article to increase my knowledge